
![]() The decision to select WordPress for my second post was an easy one. I had to choose a technology I would be using for my capstone project and it had to be one with which I was unfamiliar. WordPress met both criteria.
The decision to select WordPress for my second post was an easy one. I had to choose a technology I would be using for my capstone project and it had to be one with which I was unfamiliar. WordPress met both criteria.
WordPress.com vs. WordPress.org
The first thing I learned about WordPress was that there were two varieties: WordPress.com and WordPress.org. I definitely was going with the .com option since I could create an account, set up my first blog, and begin posting content to the web for free. (Free is Good!) WordPress.org is the paid service which provides self-hosting options, full control over one’s website, and an array of customizable features I really don’t need.
Creating an Account

After clicking the sign up link I filled in my username, supplied a working email address, glanced at the terms of service (I know it’s wrong not to read them) and clicked Sign Up. I skipped most of the profile page since I knew I could update it later. The activation email arrived. I was ready to begin.
Creating the Blog
Once my account was created I had to log back into WordPress. I had skipped the step of creating my blog earlier, so now it was time to come up with a unique name. What was my blog going to be about? How could I name it without knowing it’s purpose? With only two days in the course I had no idea.
For a week I called it HumorMe . I used to create cartoons and wanted a way to incorporate that into my project. Today, after a week in the program, EdTechTurista popped into my brain. I hope I can stay with it. It connects me to the years I lived overseas and the students I’ve taught.
With a name selected it was easy to it to get started. I had help from Lynda.com and the tutorial on the WordPress.com website: Master the Basics and Beyond.
Themes
Browsing free themes was fun. It was easy to preview and activate a theme, live with it for a while and then be able to activate another. The vision of my capstone project is just taking shape. No surprise my theme has undergone change as well.
Pages and Posts
The dashboard is intuitive. Adding a new page or post opens a text editor with basic formatting options. To embed images or video files into your blog, you’ll need to upload them to the media library. From there they can be stored and inserted directly into the post. In addition, there is an option to select the desired justification for the image prior to inserting it in the post.
Widgets
Depending on the chosen theme, there are areas on the blog page set aside to hold tiny programs called widgets. These widgets can be placed on the sidebar or in the footer and include items such as a list of recent posts, comments, and categories. Given the number of widgets available I could see how tempting it would be to clutter my webpage.
Publishing
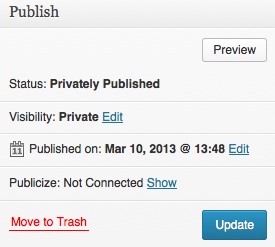
The pane on the right side of the dashboard offers a preview button, visibility options, a time/date stamp, an update button, and the option to move to trash.
There is much more to learn about WordPress, but I like what I see so far.
I’ve only just recently been able to view other students’ pages. There is amazing work out there and I’m truly inspired. Hopefully by the end of the program I will be able to create more inviting and visually rich environments than I have the skills to do now.

I like it!
Great tool! Thanks for sharing.
Pingback: BP3 WordPress.com vs. WordPress.org | Jay Daily